Thursday, March 1, 2012

Handy MySQL queries for Asterisk CDR database

Assumption:

Server: MySQL

Database name : asteriskcdr

Table name holding Call Details Record: cdr


Throughout the examples I will be extracting calldate,src,clid and dst field from 'cdr' table
Date format: YYYY-MM-DD  : calldate field in cdr table
Date1: 2011-01-01
Date2: 2011-01-02
Source number: Caller number : src field in cdr table; clid field stores callerID of caller.
Destination number: Callee number : dst field in cdr table

Date Based Search: 

Example1: Retrieving data from Date1

mysql > select calldate,src,clid,dst
              from cdr
              where DATA(calldate)='2011-01-01';

If you want to save the data to some file you can run following query:

mysql > select calldate,src,clid,dst
              from cdr
              where DATA(calldate)='2011-01-01'
              into outfile '/tmp/myfile';

Example2: Retrieving data from Date1 to Date2

mysql> select calldate,clid,dst
              from cdr
              where DATE(calldate) between '2011-01-01' and '2011-01-02';


Date and Destination Number based Search:

Example3: Retrieving data from Date1 to Date2 where destination number (callee number) is '21132'

mysql> select calldate,src,clid,dst
             from cdr
             where DATE(calldate) between '2011-01-01' and '2011-01-20'
                    and dst='21132';

Example4: Retrieving data from Date1 to Date2 where you are interested in multiple destination number (called number) e.g  '21132', '25962','20002'

mysql> select calldate,src,clid,dst
             from cdr
             where DATE(calldate) between '2011-01-01' and '2011-01-20'
                         and dst in ('21132','25962');

Example5: Use the power of REGEXP (Regular Expression): Retrieving data from Date1 to Date2 where you are interested in destination with pattern '259'


mysql> select calldate,src,clid,dst
             from cdr
             where DATE(calldate) between '2011-01-01' and '2011-01-20'
             and dst regexp '259';


Date and Source Number based Search: 

Example6: Retrieving data from Date1 to Date2 where source number (caller number) is '21132'

mysql> select calldate,src,clid,dst
             from cdr
             where DATE(calldate) between '2011-01-01' and '2011-01-20'
                    and src='21132';

Example7: Retrieving data from Date1 to Date2 where you are interested in multiple source number (callee number) e.g  '21132', '25962','20002'

mysql> select calldate,src,clid,dst
             from cdr
             where DATE(calldate) between '2011-01-01' and '2011-01-20'
                         and src in ('21132','25962');


Example8: Use the power of REGEXP (Regular Expression): Retrieving data from Date1 to Date2 where you are interested in caller number with pattern '259'


mysql> select calldate,src,clid,dst
             from cdr
             where DATE(calldate) between '2011-01-01' and '2011-01-20'
             and src regexp '259';


I hope this helps you. Good Luck!


(I have re-posted my article in my another blog for Asterisk)

Friday, August 12, 2011

INNER JOIN to find duplicates in MySQL

Let's say I have a phones table and I want to find the duplicate extensions in this table.
This table has over 20k records. So, I need query to find the duplicates to make my life easy.


We can use INNER JOIN along with logic to find the duplicate.

Query to find the duplicates:

SELECT phones.* FROM phones INNER JOIN(SELECT extension,COUNT(extension) FROM phones GROUP BY extension HAVING COUNT(extension)>1) as phones2 ON phones.extension=phones2.extension ORDER BY phones.extension LIMIT 0,200;

Explanation:
SELECT phones.* FROM phones : This reads all the columns from the table phones
SELECT extension,COUNT(extension) FROM phones GROUP BY extension HAVING COUNT(extension)>1) as phones2 : This reads all the duplicates (i.e extension count > 1) and create a VIEW phones2
ON phones.extension=phones2.extension : This a logic to check duplicate extensions
ORDER BY phones.extension : To sort the output by phones.extension
LIMIT 0,200: To display at most 200 data
References:
http://mysqljoin.com/joins/inner-join-tutorial/

Friday, September 17, 2010

Use MS Access as the frontend for MySQL

1. Download and Install ODBC connector for MySQL

http://dev.mysql.com/downloads/connector/odbc/5.1.html

2. Go to Start-->Settings-->Control Panel--> Administrative Tools -->Data Sources(ODBC)

3. Double Click "Data Sources(ODBC)"

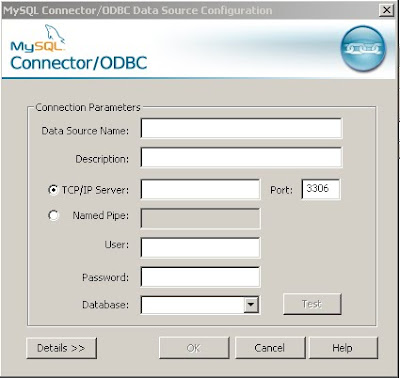
4. Click on "User DSN" tab --> Click on "Add.." button--> Scroll down to "MySQL ODBCx.x Driver, click it and Click on Finish

Populate the credentials. You can give any name for "Data Source Name". Let's say 'myData'. Specify you MySQL server IP address, username, password and the database. Click on 'Test' and see if the connector can connect to your MySQL database or not. If not, check if you can ping you MySQL box and check if the user is granted privilege to access locally or remotely.

5. Then go to Program Files and open MS Access. Create a new database and give any name you like.
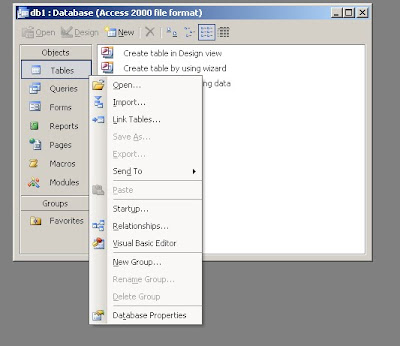
Go to Tables and Right click. Go to "Link Tables.."

Then select ODBC database() from the "Files of type" and hit on "Link" button

Then it will pop up "Select Data Source" window. Go to "Machine Data Source" tab and click on the desired data source. Let's say you have created 'myData'. Then it pulls up all the table from your defined MySQL database defined in 'myData' data source. Select the table you want to view, edit from the access.

Some Links:
AND OR logic in MySQL query
http://www.plus2net.com/sql_tutorial/sql_or_and.php

Find duplicate data using access
http://articles.techrepublic.com.com/5100-10878_11-1043732.html

Append data from one table to another in access
http://support.microsoft.com/kb/306093

Advanced queries on MySQL

1. Update the data from one Table to another Table

Let's say we have Table1 and Table2 as the following:

Table1
col_num---- col_alpha-----col_cap
1-----------------a---------------NULL
2-----------------b---------------NULL
3-----------------c---------------NULL

Table2
col_alpha---- col_cap
a-----------------A
b-----------------B
c-----------------C

Let's say you want to populate Table1.col_cap (reads as col_cap column of Table1) with the data of Table2.col_cap if Table1.col_alpha=Table2.col_alpha, you can run the following query in MySQL

UPDATE Table1 JOIN Table2 ON Table2.col_alpha=Table1.col_alpha SET Table1.col_cap=Table2.col_cap

Final Result:
Table1
col_num---- col_alpha-----col_cap
1-----------------a---------------A
2-----------------b---------------B
3-----------------c---------------C


2. Append the data from one table to the another table


Let's consider that we have above two tables: Table1 and Table2

We can use the INSERT and SELECT query to append the data.

INSERT INTO Table1 (`col_alpha`,`col_cap`) SELECT `col_alpha`,`col_cap` FROM Table2;

Final Result:
Table1
col_num---- col_alpha-----col_cap
1-----------------a---------------A
2-----------------b---------------B
3-----------------c---------------C
4-----------------a---------------A
5-----------------b---------------B
6-----------------c---------------C

3. Select the data from multiple tables


Let's consider that we have above two tables: Table1 and Table2

Say you want to view Table1.col_num and Table2.col_cap if Table1.col_alpha=Table2.col_alpha, then

SELECT Table1.col_num,Table2.col_cap FROM Table1,Table2 WHERE Table1.col_alpha=Table2.col_alpha;

Final Result: View

col_num-------------col_cap
1-------------------------A
2-------------------------B
3-------------------------C

Monday, May 24, 2010

Backup and Restore MySQL - so easy that caveman can do it...

There are various ways to perform backup and restore the MySQL database. However, I always found command line to be very easy and powerful.

Command: mysqldump

Usage:

1. Backup only one database


mysqldump -h [hostname] -u [username] -p [password] [databasename] > [backupMySQLfile.sql]

[hostname] - the hostname or IP address or loopback address i.e 127.0.0.1

[username] - the database username

[password] - the password for your database

[databasename] - the name of your database

[backupMySQLfile.sql]- the file to which the backup should be written.


The dump file will contain the SQL statements required to create the table and populate the table. Let's see one example of backing up database 'AsteriskCDR' with the username 'root' and password 'abcd1234' to a file 'DailyBackupCDR.sql'

#mysqldump -h 127.0.0.1 -u root -pabcd1234 AsteriskCDR > DailyBackupCDR.sql

[Caution: there shouldn't be the space between -p option and password]
[Note: Your system may not require to use '-h 127.0.0.1' ]


If you want to create the backup that will automatically overwrite the existing database while restoring the database without having to delete the older database manually first, you need to use the option --add-drop-table.

#mysql --add-drop-table -u root -pabcd1234 AsteriskCDR > DailyBackupCDR.sql

2. Backup with compression

Dump file are usually huge, so it's better idea to apply compression while dumping the file.

Using GZIP compression
#mysql --add-drop-table -u root -pabcd1234 AsteriskCDR gzip > DailyBackupCDR.sql.gz

or

Using ZIP compression
#mysql --add-drop-table -u root -pabcd1234 AsteriskCDR gzip > DailyBackupCDR.sql.zip

or

Using BZIP2 compression
#mysql --add-drop-table -u root -pabcd1234 AsteriskCDR bzip2 > DailyBackupCDR.sql.bz2

3. Restore the database

The backup dump file can be easily restored using the mysql command. In fact, it rebuilds the database from the scratch.


mysql -u [username] -p [password] [database_to_restore] < [backupfile]


#msyql -u root -pabcd1234 AsteriskCDR < DailyBackupCDR. sql


Compressed dump files need to be uncompressed before restore.

#unzip DailyBackupCDR.sql.zip [for zipped file]
#gunzip
DailyBackupCDR.sql.gz [for gzipped file]
#bunzip2
DailyBackupCDR.sql.bzip2 [for compression using bzip2]

unzip is the counterpart of zip
gunzip is the counterpart of gzip
bunzip2 is the counterpart of bzip2

Once the file is uncompressed, it will result in the regular dump file which can be restored using msyql command
#msyql -u root -pabcd1234 AsteriskCDR < DailyBackupCDR. sql


4. Backup entire database

#mysqldump --all-databases > alldatabases.sql


5. Backup only the database structure

#mysqldump --no-data --all-databases > alldatabases.sql


For more : http://www.devshed.com/c/a/MySQL/Backing-up-and-restoring-your-MySQL-Database/


Thursday, March 4, 2010

MySQL Basics

This Tutorial will help u gain confidence in MySQL. Just make sure that u will follow each steps. If you find any problem, just leave comment,I will reply asap.

Packages required to be installed

DEVAst02:~ # rpm -qa|grep mysql

mysql-shared-5.0.26-12.18

mysql-client-5.0.26-12.18

mysql-devel-5.0.26-12.18

mysql-5.0.26-12.18

perl-DBD-mysql-3.0002-15.2


Default config file /etc/my.conf

Post Installation:

1> Create Password for root user

Admin user id: root

Default password: blank

The first task is to assign a password:

[prompt]$ mysqladmin -u root password 'new-password'

Note: the following SQL commands will also work:

mysql> USE mysql;

mysql> UPDATE user SET Password=PASSWORD('new-password') WHERE user='root';

mysql> FLUSH PRIVILEGES;


2> Delete blank user (Security Issue)

MySql has blank user for test purpose. It should be removed.

DEVAst02:~ # mysql -h localhost -u -p

Running above command gives access to mysql. So, it needs to be deleted

mysql> show databases;

mysql> use mysql;

mysql> SELECT User,Password,Host from user;

mysql> DELETE FROM user WHERE User=' ';

mysql> FLUSH PRIVILEGES;


Some Fundamental Operations:

1> Create Database, create table, add entries, update entries, delete entires; drop table and drop database;

DEVAst02:~ # mysql -h localhost -u root -p

mysql> show databases;

mysql> create database asterisk;

mysql> show databases;

mysql> use asterisk;

mysql> show tables;

mysql> create table Records (Number char(20),Name char(20), email varchar(40));

mysql> show tables;

mysql> describe Records;

mysql> INSERT INTO Records(Number,Name,email) VALUES('25962','Dev Shah','dev.shah@something.edu');

mysql> SELECT * FROM Records;

mysql> UPDATE Records SET Name='Deven Shah' WHERE Number='25962';

mysql> SELECT * FROM Records;

mysql> DELETE FROM Records WHERE Number='25962';

mysql> drop table Records;

mysql> drop database asterisk;


Security:

Security and database access is controlled by the GRANT tables. Access to connect to the database and access to process the transaction (table and column access, etc.) are both required. Privileges are searched in the following order:

user table

db and host table

tables_priv

columns_priv


DEVAst02:~ # mysql -h localhost -u root -p

mysql> show databases;

mysql> use mysql;

mysql> show tables;

Mysql> SELECT * FROM User;

Use the user table to grant connection privileges to database by a user (host, user name and password). Grant database and table access for transaction access. i.e. grant "SELECT", "UPDATE", "CREATE", "DELETE", "ALTER" etc. permission for database, table, field (columns) or database server access.


Add a user and grant the access:

mysql> CREATE DATABASE asteriskdb;

mysql> USE mysql;

mysql> SHOW TABLES;

+-----------------+

| Tables_in_mysql |

+-----------------+

| columns_priv |

| db |

| func |

| host |

| tables_priv |

| user |

+-----------------+

mysql> INSERT INTO user (Host, User, Password, Select_priv) VALUES ('', 'asteriskuser', password('redhat'), 'Y');

mysql> FLUSH PRIVILEGES; - Required each time one makes a change to the GRANT table

mysql> GRANT ALL PRIVILEGES ON asteriskdb.* TO asteriskuser;

mysql> FLUSH PRIVILEGES; - Required each time one makes a change to the GRANT table

mysql> quit


Now try:

DEVAst02:~ # mysql -h localhost -u asteriskuser -predhat

mysql> use mysql;

ERROR 1044 (42000): Access denied for user 'asteriskuser'@'%' to database 'mysql'

mysql> use asteriskdb;

Database changed


Since you are accessing mysql as asteriskuser,you are granted only to access asteriskdb.


If you need to grant access to all databases, you should Grant

mysql> GRANT ALL PRIVILEGES ON *.* TO asteriskuser;

mysql> FLUSH PRIVILEGES;


Assignment: Create a user 'dbreader' with password 'redhat' that has read-only permission on database 'phones'.

Step1: Create user

msyql>CREATE USER 'dbreader'@'%' IDENTIFIED BY 'redhat';

Step2: Grant rights for read-only

mysql>GRANT SELECT ON phones.* TO 'dbsreader'@'%';

[Note: Granting SELECT command is enough for READ operation]

Now you should be able to access 'phones' database from any machine using user 'dbreader'.


For More: http://www.yolinux.com/TUTORIALS/LinuxTutorialMySQL.html